Inversion of Control
IoC is a technique that externalizes the creation and management of component dependencies. The core of the Spring Framework is based on the principle of IoC.
At its core, IoC aims to offer a simpler mechanism for provisioning component dependencies and managing these dependencies throughout their life cycles.
There are two types of IoC:
- dependency lookup
- dependency injection
Dependency Lookup
Dependency lookup is a much more traditional approach, and it seems more familiar to Java programmers.
There are two types of dependency lookup:
- dependency pull: in dependency pull, dependencies are pulled from a registry as required
- contextualized dependency lookup (CDL): in CDL, lookup is performed against the container that is managing the resource, not from some central registry, and it is usually performed at some set point
Dependency Injection
Dependency injection appears counterintuitive at first, but it is actually much more flexible and usable than dependency lookup.
In a Spring-based application, it is always preferable to use dependency injection. Wherever it is possible to use dependency injection with Spring, you should do so; otherwise, you can fall back on the dependency lookup capabilities.
Spring’s DI implementation is based on two core Java concepts: JavaBeans and interfaces. JavaBeans (POJOs) provide a standard mechanism for creating Java resources that are configurable in a number of ways, such as constructors and setter methods. Interfaces and DI are technologies that are mutually beneficial. By using DI, you reduce the amount of code you need to use an interface-based design in your application to almost zero. Likewise, by using interfaces, you can get the most out of DI because your beans can utilize any interface implementation to satisfy their dependency. The use of interfaces also allows Spring to utilize JDK dynamic proxy (the Proxy pattern) to provide powerful concepts such as AOP for crosscutting concerns.
The popularity of DI was acknowledged when the Java Community Progress (JCP) adopted JSR-330 (Dependency Injection for Java) in 2009. In JEE 6, JSR-330 become one of the included specifications of the entire technology stack.
There are two types of dependency injection:
- constructor dependency injection
- setter dependency injection
constructor dependency injection
Constructor dependency injection occurs when a component’s dependencies are provided to it in its constructor.
public class ConstructorInjection {
    private Dependency dependency;

    public ConstructorInjection(Dependency dependency) {
        this.dependency = dependency;
    }
}
setter dependency injection
In setter dependency injection, the IoC container injects a component’s dependencies via JavaBean-style setter methods.
public class SetterInjection {
    private Dependency dependency;

    public void setDependency(Dependency dependency) {
        this.dependency = dependency;
    }
}
setter injection vs constructor injection
Constructor injection is particularly useful when you absolutely must have an instance of the dependency class before your component is used. Constructor injection also helps achieve the use of immutable objects.
Setter injection allows dependencies to be declared on an interface, but this is an often-touted benefit. Unless you are absolutely sure that all implementations of a particular business interface require a particular dependency, let each implementation class define its own dependencies and keep the business interface for business methods.
public interface Oracle {
		String defineMeaningOfLife();
}

public class BookwormOracle implements Oracle {
		private Encyclopedia encyclopedia;
		public void setEncyclopedia(Encyclopedia encyclopedia) {
				this.encyclopedia = encyclopedia;
		}

		@Override
		public String defineMeaningOfLife() {
				return "Encyclopedias are a waste of money - go see the world instead";
		}
}
However, placing setters and getters for configuration parameters in the business interface is a good idea and makes setter injection a valuable tool.
public interface NewsletterSender {
		void setSmtpServer(String smtpServer);
		String getSmtpServer();
		void setFromAddress(String fromAddress);
		String getFromAddress();
		void send();
}
BeanFactory
The core of Spring’s dependency injection container is the BeanFactory interface. BeanFactory is responsible for managing components, including their dependencies as well as their life cycles.
If you application needs only DI support, you can interact with the Spring DI container via the BeanFactory interface. In this case, your application must create an instance of a class that implements the BeanFactory interface and configures it with bean and dependency information. After this is complete, your application can access the beans via BeanFactory and get on with its processing.
Although the BeanFactory can be configured programmatically, it is more common to see it configured externally using some kind of configuration file. Internally, bean configuration is represented by instances of classes that implement the BeanDefinition interface. The bean configuration stores information not only about a bean itself but also about the beans that it depends on. For any BeanFactory implementation classes that also implement the BeanDefinitionReader interface, you can read the BeanDefinition data from a configuration file, using either PropertiesBeanDefinitionReader or XmlBeanDefinitionReader. PropertiesBeanDefinitionReader reads the bean definition from properties files, while XmlBeanDefinitionReader reads from XML files.
So, you can identify your beans within BeanFactory; each bean can be assigned an ID, a name, or both. A bean can also be instantiated without any ID or name (known as anonymous bean) or as an inner bean within another bean. Each bean has at least one name but can have any numbers of names. Any names after the first are considered aliases for the same bean. You use bean IDs or names to retrieve a bean from BeanFactory and also to establish dependency relationships.
    public static void main(String[] args) {
        DefaultListableBeanFactory factory = new DefaultListableBeanFactory();

        XmlBeanDefinitionReader rdr = new XmlBeanDefinitionReader(factory);
        rdr.loadBeanDefinitions(new ClassPathResource("beans.xml"));

        Oracle oracle = (Oracle) factory.getBean("oracle");

        System.out.println(oracle.defineMeaningOfLife());
    }
ApplicationContext
The ApplicationContext interface is an extension to BeanFactory. In developing Spring-based applications, it’s recommended that you interact with Spring via the ApplicationContext interface. Spring supports the bootstrapping of ApplicationContext by manual coding (instantiate it manually and loads the appropriate configuration) or in a web container environment via ContextLoaderListener.
bean definition example 1
<bean id="provider" class="HelloWorldMessageProvider"/>

<bean id="renderer" class="StandardOutMessageRenderer">
		<property name="messageProvider" ref="provider"/>
</bean>
bean definition example 2
To create bean definitions using annotations, the bean classes must be annotated with the appropriate stereotype annotation, and the methods or constructors must be annotated with @Autowired to tell the Spring IoC container to look for a bean of that type and use it as an argument when calling that method.
@Component("provider")
public class HelloWorldMessageProvider implements MessageProvider {
    @Override
    public String getMessage() {
        return "Hello, World";
    }
}

@Service("renderer")
public class StandardOutMessageRenderer implements MessageRenderer {

    private MessageProvider messageProvider;

    @Override
    public void render() {
        if (messageProvider == null) {
            throw new RuntimeException("messageProvider is null");
        }
        System.out.println(messageProvider.getMessage());
    }

    @Override
    @Autowired
    public void setMessageProvider(MessageProvider messageProvider) {
        this.messageProvider = messageProvider;
    }

    @Override
    public MessageProvider getMessageProvider() {
        return messageProvider;
    }
}
<context:component-scan base-package="xxx"/>
The <context:component-scan> tag tells Spring to scan the code for injectable beans under the package specified.
bean definition example 3
@Configuration
public class HelloWorldConfig {

    @Bean
    public MessageProvider provider() {
        return new HelloWorldMessageProvider();
    }

    @Bean
    public MessageRenderer renderer() {
        MessageRenderer renderer = new StandardOutMessageRenderer();
        renderer.setMessageProvider(provider());
        return renderer;
    }
}
bean definition example 4
@Component("provider")
public class HelloWorldMessageProvider implements MessageProvider {
    @Override
    public String getMessage() {
        return "Hello, World";
    }
}

@Service("renderer")
public class StandardOutMessageRenderer implements MessageRenderer {

    private MessageProvider messageProvider;

    @Override
    public void render() {
        if (messageProvider == null) {
            throw new RuntimeException("messageProvider is null");
        }
        System.out.println(messageProvider.getMessage());
    }

    @Override
    @Autowired
    public void setMessageProvider(MessageProvider messageProvider) {
        this.messageProvider = messageProvider;
    }

    @Override
    public MessageProvider getMessageProvider() {
        return messageProvider;
    }
}
@ComponentScan(basePackages = {"xxx"})
@Configuration
public class HelloWorldConfiguration {
}
To be able to look for bean definitions inside Java classes, component scanning has to be enabled. This is done by annotating the configuration class with @ComponentScanning that is the equivalent of the <context:component-scanning> element.
injecting simple values
<bean id="injectSimple" class="InjectSimple">
    <property name="name" value="John Mayer" />
    <property name="age" value="39" />
    <property name="height" value="1.92" />
    <property name="programmer" value="false" />
    <property name="ageInSeconds" value="1241401112" />
</bean>
@Service("injectSimple")
public class InjectSimple {
    @Value("John Mayer")
    private String name;

    @Value("39")
    private int age;

    @Value("1.92")
    private float height;

    @Value("false")
    private boolean programmer;

    @Value("1241401112")
    private Long ageInSeconds;

    ......
}
injecting values by using SpEL
<bean id="injectSimpleConfig" class="InjectSimpleConfig" />

<bean id="injectSimple" class="InjectSimple">
    <property name="name" value="#{injectSimpleConfig.name}" />
    <property name="age" value="#{injectSimpleConfig.age + 1}" />
    <property name="height" value="#{injectSimpleConfig.height}" />
    <property name="programmer" value="#{injectSimpleConfig.programmer}" />
    <property name="ageInSeconds" value="#{injectSimpleConfig.ageInSeconds}" />
</bean>
@Service("injectSimple")
public class InjectSimple {
    @Value("#{injectSimpleConfig.name}")
    private String name;

    @Value("#{injectSimpleConfig.age + 1}")
    private int age;

    @Value("#{injectSimpleConfig.height}")
    private float height;

    @Value("#{injectSimpleConfig.programmer}")
    private boolean programmer;

    @Value("#{injectSimpleConfig.ageInSeconds}")
    private Long ageInSeconds;

    ......
}
injecting collection values
    <bean id="collectionInjection" class="CollectionInjection">
        <property name="map">
            <map>
                <entry key="someValue">
                    <value>It's a Friday, we finally made it</value>
                </entry>
                <entry key="someBean">
                    <ref bean="lyricHolder"/>
                </entry>
            </map>
        </property>
        <property name="set">
            <set>
                <value>I can't believe I get to see your face</value>
                <ref bean="lyricHolder"/>
            </set>
        </property>
        <property name="list">
            <list>
                <value>You've been working and I've been waiting</value>
                <ref bean="lyricHolder"/>
            </list>
        </property>
        <property name="props">
            <props>
                <prop key="firstName">John</prop>
                <prop key="secondName">Mayer</prop>
            </props>
        </property>
    </bean>
@Service("collectionInjection")
public class CollectionInjection {
    // all beans of type Map<String, Object> will be injected
    @Autowired
    private Map<String, Object> map;

    @Resource(name = "set")
    private Set set;

    @Resource(name = "list")
    private List list;

    @Resource(name = "props")
    private Properties props;
}
    <util:map id="map" map-class="java.util.HashMap">
        <entry key="someValue">
            <value>It's a Friday, we finally made it</value>
        </entry>
        <entry key="someBean">
            <ref bean="lyricHolder"/>
        </entry>
    </util:map>

    <util:set id="set" set-class="java.util.HashSet">
        <value>I can't believe I get to see your face</value>
        <ref bean="lyricHolder"/>
    </util:set>

    <util:list id="list" list-class="java.util.ArrayList">
        <value>I can't believe I get to see your face</value>
        <ref bean="lyricHolder"/>
    </util:list>

    <util:properties id="props">
        <prop key="firstName">John</prop>
        <prop key="secondName">Mayer</prop>
    </util:properties>
lookup method injection
Lookup Method Injection was used to overcome the problems encountered when a bean depends on another bean with a different life cycle, specifically, when a singleton depends on a nonsingleton. In this situation, both setter and constructor injection result in the singleton maintaining a single instance of what should be a nonsingleton bean. In some cases, you will want to have the singleton bean obtain a new instance of the nonsingleton every time it requires the bean in question.
Lookup Method Injection works by having your singleton declare a method, the lookup method, which returns an instance of the nonsingleton bean. When you obtain a reference to the singleton in your application, you are acutally receiving a reference to a dynamically created subclass on which Spring has implemented the lookup method.
@Component("singer")
@Scope("prototype")
public class Singer {
    private String lyric = "I played a quick game of chess with the salt and pepper shaker";

    public void sing() {
    }
}

@Component("abstractLookupBean")
public class AbstractLookupDemoBean implements DemoBean {
    @Lookup("singer")
    public Singer getMySinger() {
        return null;
    }

    @Override
    public void doSomething() {
        getMySinger().sing();
    }
}
method replacement
Using method replacement, you can replace the implementation of any method on any bean arbitrarily without having to change the source of the bean you are modifying.
Internally, you achieve this by creating a subclass of the bean class dynamically. You use CGLIB and redirect calls to the method you want to replace to another bean that implements the MethodReplacer interface.
The MethodReplacer interface has a single method, reimplement(), that you must implement. Three arguments are passed to reimplement(): the bean on which the original method was invoked, a Method instance that represents the method that is being overriden, and the array of arguments passed to the method.
public class ReplacementTarget {
    public String formatMessage(String message) {
        return "<h1>" + message + "</h1>";
    }

    public String formatMessage(Object message) {
        return "<h1>" + message + "</h1>";
    }
}

public class FormatMessageReplacer implements MethodReplacer {
    @Override
    public Object reimplement(Object obj, Method method, Object[] args) throws Throwable {
        if (isFormatMessageMethod(method)) {
            String msg = (String) args[0];
            return "<h2>" + msg + "</h2>";
        } else {
            throw new IllegalArgumentException("Unable to reimplement method " + method.getName());
        }
    }
}
    <bean id="methodReplacer" class="FormatMessageReplacer" />

    <bean id="replacementTarget" class="ReplacementTarget">
        <replaced-method name="formatMessage" replacer="methodReplacer">
            <arg-type>String</arg-type>
        </replaced-method>
    </bean>

    <bean id="standardTarget" class="ReplacementTarget" />
ApplicationContext nesting
Spring supports a hierarchical structure for ApplicationContext so that one context (and hence the associating BeanFactory) is considered the parent of another. By allowing ApplicationContexts to be nested, Spring allows you to split your configuration into different files, which is a godsend on larger projects with lots of beans.
When nesting ApplicationContext instances, Spring allows beans in what is considered the child context to reference beans in the parent context.
bean naming
Spring supports quite a complex bean-naming structure that allows you the flexibility to handle many situations. Every bean must have at least one name that is unique within the containing ApplicationContext.
If you give the <bean> tag an id attribute, the value of that attribute is used as the name. If no id attribute is specified, Spring looks for a name attribute, and if one is defined, it uses the first name defined in the name attribute. If neither the id nor the name attribute is specified, Spring uses the bean’s class name as the name, provided, of course, that no other bean is using the same class name. If multiple beans of the same type without an ID or name are declared, Spring will throw an exception on injection during ApplicationContext initialization.
<bean id="string1" class="java.lang.String" />
<bean name="string2" class="java.lang.String" />
<bean class="java.lang.String" />
As a general practice, you should give your bean a name by using the id attribute and then associate the bean with other names by using name aliasing.
Spring allows a bean to have more than one name. You can achieve this by specifying a space-, comma-, or semicolon-separated list of names in the name attribute of the bean’s <bean> tag. Besides using the name attribute, you can use the <alias> tag for defining aliases for Spring bean names.
<bean id="john" name="jon johnny,jonathan;jim" class="java.lang.String" />
<alias name="john" alias="ion" />
    @Configuration
    public static class AliasBeanConfig {
        @Bean(name = {"johnMayer", "john", "jonathan", "johnny"})
        public Singer singer() {
            return new Singer();
        }
    }
bean instantiation mode
By default, all beans in Spring are singletons. This means Spring maintains a single instance of the bean, all dependent objects use the same instance, and all calls to ApplicationContext.getBean() return the same instance.
The main positve your gain from Spring’s instantiation management is that your applications can immediately benefit from the lower memory usage associated with singletons, with very little effort on your part. Then, if you find that singleton mode does not meet the needs of your application, it is a trivial task to modify your configuration to use non-singleton mode.
Spring instantiation modes:
- singleton: the default scope. Only one object will be created per Spring IoC container
- prototype: a new instance will be created by Spring when requested by the application
- request: for web application use. When using Spring MVC for web applications, beans with request scope will be instantiated for every HTTP request and then be destroyed when the request is completed
- session: for web application use. When using Spring MVC for web applications, beans with session scope will be instantiated for every HTTP session and then be destroyed when the session is over
- global session: for portlet-bases web applications. The global session scope beans can be shared among all portlets within the same Spring MVC-powered portal application
- therad: a new bean instance will be created by Spring when requested by a new thread, while for the same thread, the same bean instance will be returned. Note that this scope is not registered by default
- custom: custom bean scope that can be created by implementing the interface org.springframework.beans.factory.config.Scope and registering the custom scope in Spring’s configuration
singleton instantiation mode
In general, singletons should be used in the following scenarios:
- shared object with no state: you have an object that maintains no state and has many dependent objects. Because you do not need synchronization if there is no state, you do not need to create a new instance of the bean each time a dependent object needs to use it for some processing
- shared object with read-only state
- shared object with shared state: if you have a bean that has state that must be shared, singleton is the ideal choice. In this case, ensure that your synchronization for state writes is as granular as possible
- high-throughput objects with writable states: if you have a bean that is used a great deal in your application, you may find that keeping a singleton and synchronizing all write access to the bean state allows for better performance than constantly creating hundreds of instances of the bean. You will find that this approach is particularly useful when your application creates a large number of instances over a long period of time, when your shared object has only a small amount of writable states, or when the instantiation of a new instance is expensive
You can consider using nonsingletons in the following scenarios:
- objects with large number of writable states: if you have a bean that has a lot of writable states, you may find that the cost of synchronization is greater than the cost of creating a new instance to handle each request from a dependent object
- objects with private state: some dependent objects need a bean that has private state so that they can conduct their processing separately from other objects that depend on that bean
prototype instantiation mode
The prototype scope instructs Spring to instantiate a new instance of the bean every time a bean instance is required by the application.
    <bean id="nonSingleton" class="Singer" scope="prototype">
        <constructor-arg>
            <value>John Mayer</value>
        </constructor-arg>
    </bean>
@Component("nonSingleton")
@Scope("prototype")
public class Singer {
    private String name = "unknown";

    public Singer(@Value("John Mayer") String name) {
        this.name = name;
    }
}
resolving dependencies
During normal operation, Spring is able to resolve dependencies by simply looking at your configuration file or annotations in your classes. In this way, Spring can ensure that each bean is configured in the correct order so that each bean has its dependencies correctly configured.
Unfortunately, Spring is not aware of any dependencies that exist between beans in your code that are not specified in the configuration. You can provide Spring with additional information about your bean dependencies using the depends-on attribute of the <bean> tag or @DependsOn.
autowiring
Spring supports five modes for autowiring:
- no: this is the default
- byName: Spring attempts to wire each property to a bean of the same name
- byType: Spring attempts to wire each of the properties on the target bean by automatically using a bean of the same type
- constructor: this functions just like byType wiring, except that use constructors rather than setters to perform the injection
- default: Spring will choose between constructor and byType modes automatically. If your bean has a default constructor, Spring uses byType; otherwise, it uses constructor
When autowiring by type, things get complicated when bean types are related, and exceptions are thrown when you have more classes that implement the same interface and the property requiring to be autowired specifies the interface as the type, because Spring does not know which bean to inject.
The default autowiring when using configuration via annotation is byType.
In most cases, the answer to the question of whether you should use autowiring is definitely not. Autowiring can save you time in small applications, but in many cases, it leads to bad practices and is inflexible in large applications.
bean inheritance
Spring allows you to provide a <bean> definition that inherits its property settings from another bean in the same ApplicationContext instance. You can override the values of any properties on the child bean as required, which allows you to have full control, but the parent bean can provide each of your beans with a base configuration.
    <bean id="parent" class="Singer">
        <property name="name" value="John Mayer" />
        <property name="age" value="39" />
    </bean>

    <bean id="child" class="Singer" parent="parent">
        <property name="age" value="0" />
    </bean>
Bean Life Cycle Management
An important part of any IoC container, Spring included, is that beans can be constructed in such a way that they receive notifications at certain points in their life cycle. This enables your beans to perform relevant processing at certain points throughout their life.
In general, two life-cycle events are particularly relevant to a bean: post-initialization and pre-destruction. In the context of Spring, the post-initialization event is raised as soon as Spring finishes setting all the property values on the bean and finishes any dependency checks that you configured it to perform. The pre-destruction event is fired just before Spring destroys the bean instance.
By being aware of when it is initialized, a bean can check whether all its required dependencies are satisfied. Using an initialization callback, your bean can check for the dependencies it requires, throwing an exception or providing a default as needed.
The destruction callback is often used in conjunction with the initialization callback. In many cases, you create and configure a resource in the initialization callback and then release the resource in the destruction callback.
The destruction callback is an ideal mechanism for ensuring that your applications shut down gracefully and do not leave resources open or in an inconsistent state.
Spring provides three mechanisms a bean can use to hook into each of these events and perform some additional processing: interface-based, method-based, and annotation-based mechanisms.
Overall, the choice of which mechanism you use for receiving life-cycle notifications depends on your application requirement. If you are concerned about portability or you are just defining one or two beans of a particular type that need the callbacks, use the method-based mechanism. If you use annotation-type configuration and are certain that you are using an IoC container that supports JSR-250, use the annotation mechanism. If you are not too concerned about portability or you are defining many beans of the same type that need the life-cycle notifications, using the interface-based mechanism is the best way to ensure that your beans always receive the notifications they are expecting.
When configuring initialization with init-method or @PostConstruct, there is the advantage of declaring the initialization method to be private. The Spring IoC will be able to call it via reflection, but any additional calls in the code won’t be permitted.
interface-based
Using the interface-based mechanism, your bean implements an interface specific to the type of notification it wants to receive, and Spring notifies the bean via a callback method defined in the interface.
The InitializingBean interface defined in Spring allows you to define inside your bean code that you want the bean to receive notification that Spring has finished configuring it.
public class Singer implements InitializingBean {
    @Override
    public void afterPropertiesSet() throws Exception {
        System.out.println("Initializing bean");

        if (name == null) {
            System.out.println("Using default name");
            name = DEFAULT_NAME;
        }

        if (age == Integer.MIN_VALUE) {
            throw new IllegalArgumentException("You must set the age property of any beans of type " + Singer.class);
        }
    }

}
As with initialization callbacks, Spring provides an interface, DisposableBean, that can be implemented by your beans as a mechanism for receiving destruction callbacks.
public class DestructiveBean implements DisposableBean {
    @Override
    public void destroy() {
        System.out.println("destroying bean");

        if (!file.delete()) {
            System.err.println("Error: failed to delete file");
        }

        System.out.println("File exists: " + file.exists());
    }
}
method-based
For the method-based mechanism, Spring allows you to specify, in your ApplicationContext configuration, the name of a method to call when the bean is initialized and the name of a method to call when the bean is destroyed.
<bean id="singerOne" class="Singer" init-method="init">
    <property name="name" value="John Mayer"/>
    <property name="age" value="39" />
</bean>
<bean id="destructiveBean" class="DestructiveBean" destroy-method="destroy">
    <property name="filePath" value="/tmp/test.txt"/>
</bean>
annotation-based
For the annotation-based mechanism, you can use JSR-250 annotations to specify the method that Spring should call after construction or before destruction.
public class Singer {
    @PostConstruct
    public void init() {
        System.out.println("Initializing bean");

        if (name == null) {
            System.out.println("Using default name");
            name = DEFAULT_NAME;
        }

        if (age == Integer.MIN_VALUE) {
            throw new IllegalArgumentException("You must set the age property of any beans of type " + Singer.class);
        }
    }
}
public class DestructiveBean {
    @PreDestroy
    public void destroy() {
        System.out.println("destroying bean");

        if (!file.delete()) {
            System.err.println("Error: failed to delete file");
        }

        System.out.println("File exists: " + file.exists());
    }
}
Another way to declare the initialization method for a bean is to specify the initMethod attribute for the @Bean annotation and set the initialization method name as its value.
@Configuration
public class Config {
    @Lazy
    @Bean(initMethod = "init")
    Singer singerOne() {
        Singer singer = new Singer();
        singer.setName("John Mayer");
        singer.setAge(39);
        return singer;
    }

    @Lazy
    @Bean(initMethod = "init")
    Singer singerTwo() {
        Singer singer = new Singer();
        singer.setAge(72);
        return singer;
    }

    @Lazy
    @Bean(initMethod = "init")
    Singer singerThree() {
        Singer singer = new Singer();
        singer.setName("John Mayer");
        return singer;
    }
}
Another way to declare the destroy method for a bean is to specify the destroyMethod attribute for the @Bean annotation and set the destroy method name as its value.
@Configuration
public class Config {
    @Lazy
    @Bean(initMethod = "afterPropertiesSet", destroyMethod = "destroy")
    DestructiveBean destructiveBean() {
        DestructiveBean bean = new DestructiveBean();
        bean.setFilePath("/tmp/test.txt");
        return bean;
    }
}
order of resolution
All initialization mechanisms can be used on the same bean instance. Spring invokes the method annotated with @PostConstruct first and then afterPropertiesSet(), followed by the initialization method specified in the configuration file.
As with the case of bean creation, you can use all mechanisms on the same bean instance for bean destruction. Spring invokes the method annotated with @PreDestruct first and then DisposableBean.destroy(), followed by your destroy method configured in your XML definition.
Bean creation process:
- The constructor is called first to create the bean.
- The dependencies are injected (setters are called).
- Now that the beans exist and the dependencies were provided, the preinitialization BeanPostProcessor infrastructure beans are consulted to see whether they want to call anything from this bean. These are Spring-specific infrastructure beans that perform bean modifications after they are created. The @PostConstruct annotation is registered by CommonAnnotationBeanPostProcessor, so this bean will call the method found annotated with @PostConstruct. This method is executed right after the bean has been constructed and before the class is put into service, before the actual initialization of the bean (before afterPropertiesSet and init-method).
- The InitializingBean’s afterPropertiesSet is executed right after the dependencies are injected. The afterPropertiesSet() method is invoked by a BeanFactory after it has set all the bean properties supplied and has satisfied BeanFactoryAware and ApplicationContextAware.
- The init-method attribute is executed last because this is the actual initialization method of the bean.
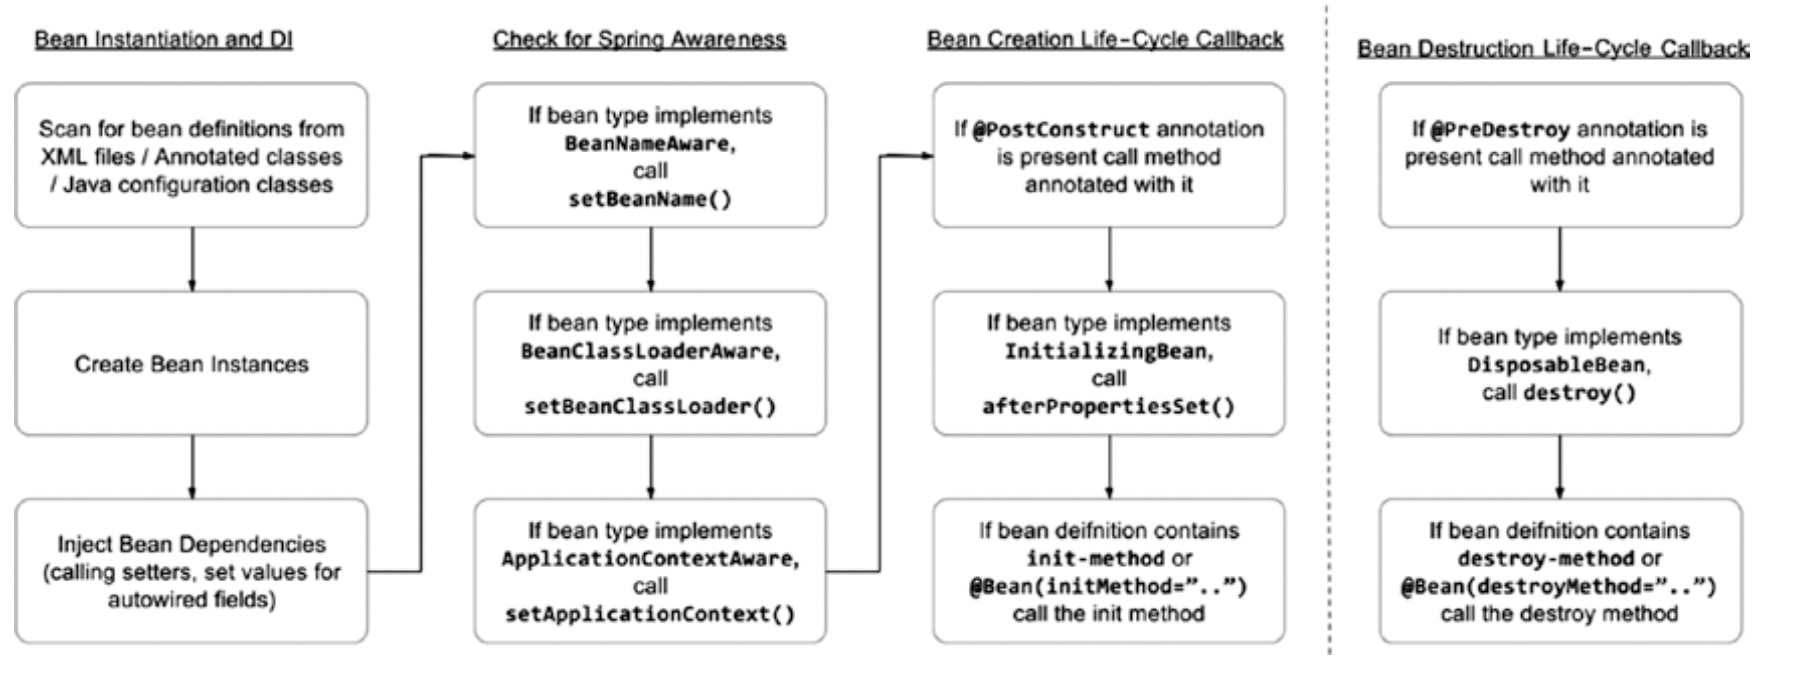
BeanNameAware
The BeanNameAware interface, which can be implemented by a bean that wants to obtain its own name, has a simple method: setBeanName(String). Spring calls the setBeanName() method after it has finished configuring your bean but before any life-cycle callbacks are called.
public class Singer implements BeanNameAware {
    private String name;

    @Override
    public void setBeanName(String name) {
        this.name = name;
    }
}
ApplicationContextAware
ApplicationContextAware is a Spring-specific interface that forces an implementation of a setter for an ApplicationContext object. It is automatically detected by the Spring IoC container, and the ApplicationContext that the bean is created in is injected into it. This is done after the constructor of the bean is called, so obviously using ApplicationContext in the constructor will lead to a NullPointerException.
Using the ApplicationContextAware interface, it is possible for your beans to get a reference to the ApplicationContext instance that configured them. The main reason this interface was created is to allow a bean to access Spring’s ApplicationContext in your application, for example, to acquire other Spring beans programmatically, using getBean(). You should, however, avoid this practice and use dependency injection to provide your beans with their collaborators. If you use the lookup-based getBean() approach to obtain dependencies when you can use dependency injection, you are adding unnecessary complexity to your beans and coupling them to the Spring framework without any good reason.
public class ShutdownHookBean implements ApplicationContextAware {
    @Override
    public void setApplicationContext(ApplicationContext ctx) throws BeansException {
        if (ctx instanceof GenericApplicationContext) {
            ((GenericApplicationContext)ctx).registerShutdownHook();
        }
    }
}
FactoryBean
One of the problems that you will face when using Spring is how to create and then inject dependencies that cannot be created simply by using the new operator. To overcome this problem, Spring provides the FactoryBean interface that acts as an adapter for objects that cannot be created and managed using the standard Spring semantics.
Simply put,a FactoryBean is a bean that acts as a factory for other beans. FactoryBeans are configured within your ApplicationContext like any normal bean, but when Spring uses the FactoryBean interface to satisfy a dependency or lookup request, it does not return FactoryBean; instead, it invokes the FactoryBean.getObject() method and returns the result of that invocation.
FactoryBeans are the perfect solution when you are working with classes that cannot be created by using the new operator. If you work with objects that are created by using a factory method and you want to use these classes in a Spring application, create a FactoryBean to act as an adapter, allowing your classes to take full advantage of Spring’s IoC capabilities.
public class MessageDigestFactoryBean implements FactoryBean<MessageDigest>, InitializingBean {
    private String algorithmName = "MD5";

    private MessageDigest messageDigest = null;

    @Override
    public MessageDigest getObject() throws Exception {
        return messageDigest;
    }

    @Override
    public Class<MessageDigest> getObjectType() {
        return MessageDigest.class;
    }

    @Override
    public boolean isSingleton() {
        return true;
    }

    @Override
    public void afterPropertiesSet() throws Exception {
        messageDigest = MessageDigest.getInstance(algorithmName);
    }

    public void setAlgorithmName(String algorithmName) {
        this.algorithmName = algorithmName;
    }

}
PropertyEditor
java.beans.PropertyEditor is an interface that converts a property’s value to and from its native type representation into a String. Because PropertyEditors are inherently lightweight classes, they have found uses in many settings, including Spring.
public class DateTimePropertyEditor extends PropertyEditorSupport {
	private DateTimeFormatter dateTimeFormatter;

	public DateTimePropertyEditor(DateTimeFormatter dateTimeFormatter) {
		this.dateTimeFormatter = dateTimeFormatter;
	}

	@Override
	public void setAsText(String text) throws IllegalArgumentException {
		setValue(DateTime.parse(text, dateTimeFormatter));
	}
}

public class DateTimePropertyEditorRegistrar implements PropertyEditorRegistrar {
  private DateTimeFormatter dateTimeFormatter;

  public DateTimePropertyEditorRegistrar(String dateFormatPattern) {
    dateTimeFormatter = DateTimeFormat.forPattern(dateFormatPattern);
  }

  @Override
  public void registerCustomEditors(PropertyEditorRegistry registry) {
    registry.registerCustomEditor(DateTime.class, new DateTimePropertyEditor(dateTimeFormatter));
  }
}
public class FullNamePropertyEditor extends PropertyEditorSupport {
    @Override
    public void setAsText(String text) throws IllegalArgumentException {
        String[] name = text.split("\\s");

        setValue(new FullName(name[0], name[1]));
    }
}

public class FullNamePropertyEditorRegistrar implements PropertyEditorRegistrar {
  @Override
  public void registerCustomEditors(PropertyEditorRegistry registry) {
    registry.registerCustomEditor(FullName.class, new FullNamePropertyEditor());
  }
}